Plastic Text
Learn how to create this sleek plastic text using only layer styles.
- Blending Options
First create a new document. I created a 328x85px document and filled ( Edit > Fill ) the background with color Hex #4e4e4e.
Using the Horizontal Type Tool, write some text. The text I created uses the font "Ariel Black" at a size of 72pt and with a color of white ( Hex #ffffff ).

All this style of text needs in order for completion is a Layer Style. To create the layer style, open the Blending Options of the text layer. Do this by right clicking the layer on the Layer Palette and clicking on "Blending Options".
Over the next 3 steps, we will be adding 3 Blending Options: Drop Shadow, Bevel and Emboss, and Gradient Overlay.
 First we will add the Drop Shadow. Click on the image to the left and use the values shown in your own Layer Styles window.
We use the Drop Shadow to create the illusion that the text is not quite on the background and is instead floating above it. It adds depth to the text without actualy manipulating the text itself.

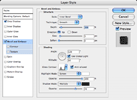
 Now add a Bevel and Emboss . Click on the image to the right and use the values shown in your own Layer Styles window.
Be sure to create a new custom Gloss Countour. Do this by clicking on the arrow on the Glass Contour box, then clicking on the little arrow on the window that pops up. Make a contour similar to the one in the image to the right.
The Bevel and Emboss makes the illusion of 3-dimensions by adding shine and shadows to the text. We changed the Glass Contour in order to make the shine appear not right on the edge of the text but somewhat inside.

Now you want to save this Layer Style so you can use it later whenever you want. Without closing your Blending Options, click on the "New Style..." button. Name your style "Plastic Text" and Click "OK".
You should now be able to click on the style in the Styles Window ( Window > Styles ) to apply it to any layer you want. It works best on text layers but it will also work for anything else!


